As the leaves turn golden and the air gets crisp, there’s something undeniably magical about fall. For me, it’s the season of cozy sweaters, warm drinks, and, of course, pumpkin-everything. If you’re like me, you’re probably already dreaming of those autumnal flavors that make every gathering feel like a hug in food form. That’s why I’m thrilled to share my absolute favorite fall dessert recipe with you: Pumpkin Cheesecake Bars. These bars are the perfect blend of creamy, spiced, and sweet, with a buttery graham cracker crust that’ll have everyone asking for seconds (and the recipe!).
At Familyhouse, we’re all about creating moments that bring loved ones together, and what better way to do that than with a dessert that screams fall? Whether you’re hosting a Thanksgiving feast, a cozy family game night, or just craving something indulgent to pair with your pumpkin spice latte, these Pumpkin Cheesecake Bars are your new go-to. In this post, I’ll walk you through the recipe, share some tips to make it your own, and sprinkle in a few personal stories to make your baking experience as warm as the dessert itself. Let’s dive in!
Why Pumpkin Cheesecake Bars Are a Fall Must-Have
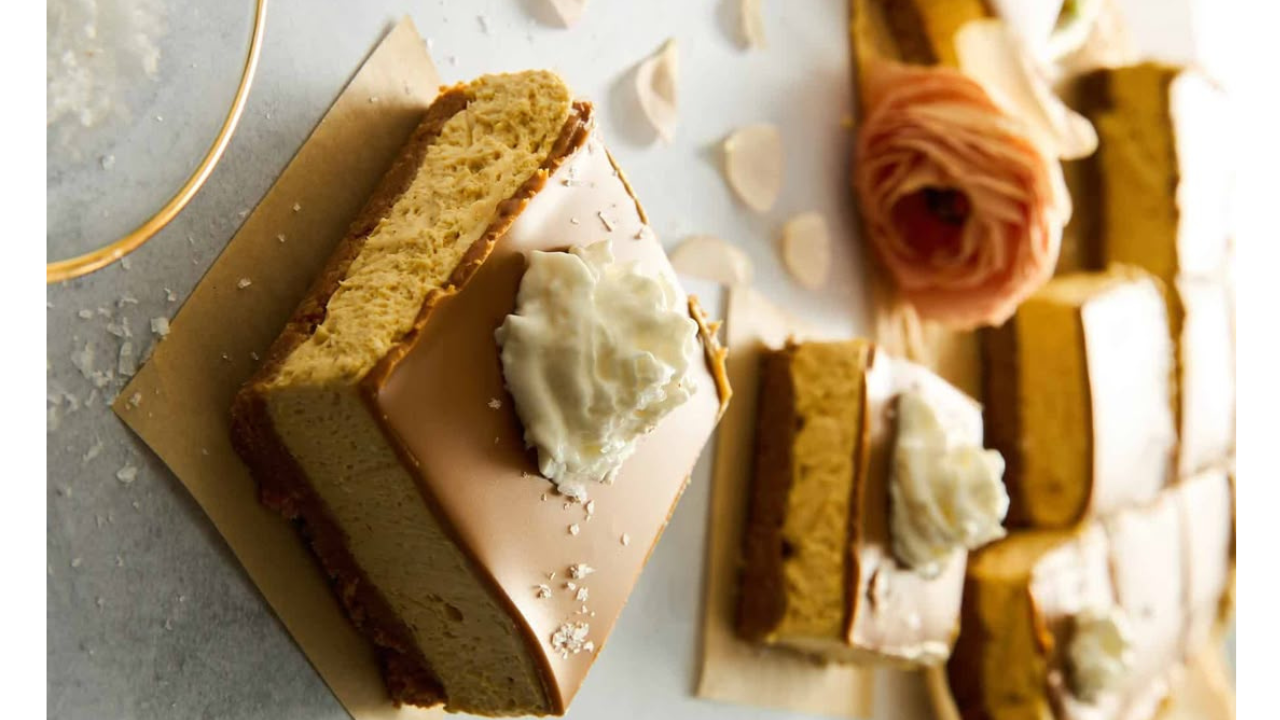
Before we get to the recipe, let’s talk about why these bars are such a game-changer. Picture this: a velvety pumpkin-spiced cheesecake layer sitting atop a crunchy, buttery graham cracker crust, with just the right amount of sweetness to balance the warm spices. They’re rich but not heavy, festive but not overly complicated, and they’re perfect for sharing (or, let’s be honest, hoarding for yourself). Plus, they’re way easier to make than a traditional cheesecake—no water baths or springform pans required!
I first made these bars a few Thanksgivings ago when I wanted to switch things up from the usual pumpkin pie. Don’t get me wrong, I love a classic pie, but there’s something about these bars that feels a little more special. They’re portable, easy to slice, and they look stunning on a dessert table. My family went wild for them, and now they’re a non-negotiable part of our fall gatherings. I hope they become a tradition in your home, too!
Ingredients You’ll Need
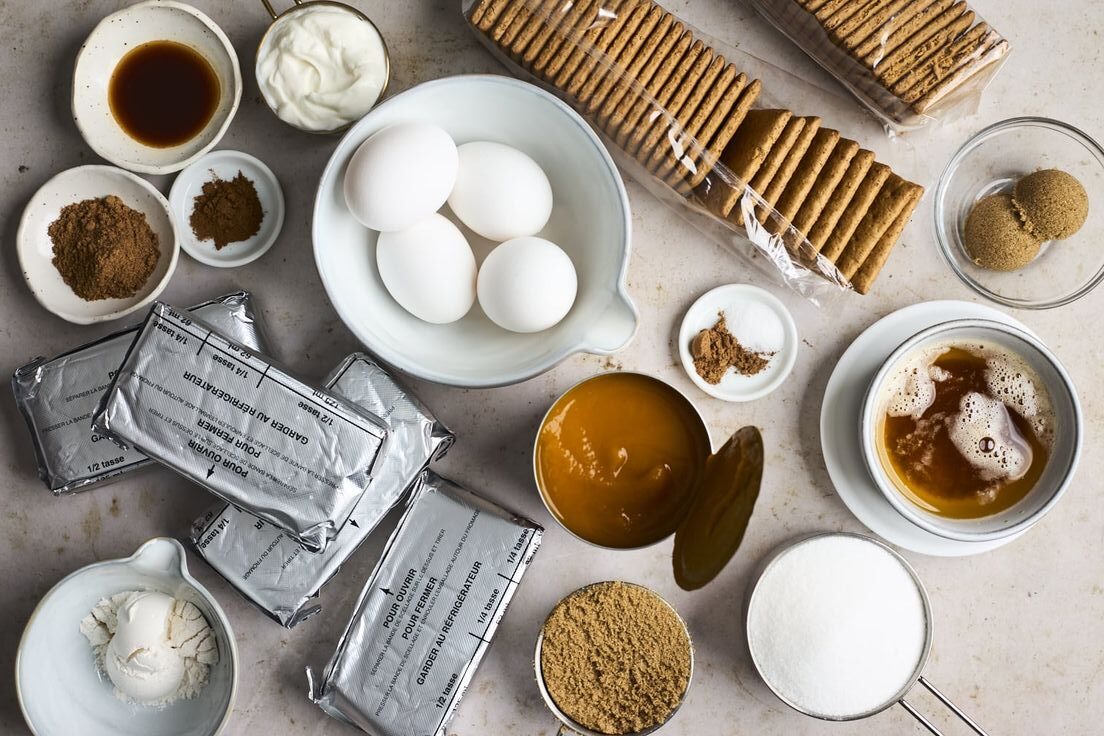
This recipe makes about 16 bars, perfect for a crowd or for savoring over a few days. Here’s what you’ll need to bring these beauties to life:
For the Graham Cracker Crust:
- 1 ½ cups graham cracker crumbs (about 10–12 full graham crackers)
- ¼ cup granulated sugar
- ½ cup unsalted butter, melted
- Pinch of salt

For the Pumpkin Cheesecake Filling:
- 16 oz (2 packages) cream cheese, softened to room temperature
- ¾ cup granulated sugar
- ½ cup brown sugar, packed
- 1 cup canned pumpkin puree (not pumpkin pie filling)
- 2 large eggs, at room temperature
- 1 tsp vanilla extract
- 1 ½ tsp pumpkin pie spice
- ½ tsp ground cinnamon
- ¼ tsp ground nutmeg
- ¼ tsp salt
- 2 tbsp all-purpose flour
For the Optional Whipped Cream Topping:
- 1 cup heavy whipping cream
- 2 tbsp powdered sugar
- ½ tsp vanilla extract
- A sprinkle of cinnamon or pumpkin pie spice for garnish
Tools:
- 9×9-inch baking pan
- Parchment paper
- Mixing bowls
- Electric mixer or whisk
- Spatula
- Measuring cups and spoons
Step-by-Step Instructions
Now, let’s get baking! I’ve broken this down into simple steps to make the process as smooth as possible. Even if you’re not a seasoned baker, you’ve got this.
Step 1: Prepare the Crust
- Preheat your oven to 350°F (175°C). Line a 9×9-inch baking pan with parchment paper, leaving some overhang on the sides for easy removal later.
- In a medium bowl, combine the graham cracker crumbs, sugar, and salt. Pour in the melted butter and stir until the mixture looks like wet sand.
- Press the crumb mixture firmly into the bottom of the prepared pan using the back of a spoon or the bottom of a measuring cup. You want it to be compact and even.
- Bake the crust for 8–10 minutes, until it’s lightly golden and fragrant. Set it aside to cool while you make the filling.
Pro Tip: If you don’t have pre-made graham cracker crumbs, just pulse whole graham crackers in a food processor or crush them in a zip-top bag with a rolling pin. It’s a great way to get out any pent-up stress!
Step 2: Make the Pumpkin Cheesecake Filling
- In a large mixing bowl, beat the softened cream cheese with an electric mixer (or a whisk if you’re feeling strong) until smooth and creamy, about 2 minutes.
- Add the granulated sugar and brown sugar, and beat until fully combined and no lumps remain.
- Mix in the pumpkin puree, eggs, vanilla extract, pumpkin pie spice, cinnamon, nutmeg, salt, and flour. Beat until the mixture is smooth and well-blended, but don’t overmix—you want to keep the filling light and airy.
- Pour the filling over the cooled crust and spread it evenly with a spatula.
Personal Note: The first time I made these, I accidentally used pumpkin pie filling instead of puree—big mistake! The filling was way too sweet and didn’t set properly. Make sure you grab 100% pure pumpkin puree for the best texture and flavor.
Step 3: Bake and Chill
- Bake the bars at 350°F (175°C) for 35–40 minutes, or until the edges are set and the center has a slight jiggle (like a cheesecake should!).
- Remove from the oven and let the bars cool completely at room temperature, about 1 hour. Then, cover and refrigerate for at least 4 hours, or overnight for the best results. This chilling step is key to getting that perfect creamy texture.
Step 4: Make the Whipped Cream (Optional)
- In a chilled mixing bowl, whip the heavy cream, powdered sugar, and vanilla extract with an electric mixer until soft peaks form.
- Spread or pipe the whipped cream over the chilled bars, and sprinkle with a pinch of cinnamon or pumpkin pie spice for a festive touch.
Step 5: Slice and Serve
- Use the parchment paper overhang to lift the bars out of the pan. Place on a cutting board and slice into 16 even squares (or smaller pieces if you want bite-sized treats).
- Serve chilled or at room temperature, depending on your preference. Store any leftovers in an airtight container in the fridge for up to 5 days.
Tips for Pumpkin Cheesecake Bar Success
- Room Temperature Ingredients: Make sure your cream cheese and eggs are at room temperature before mixing. This ensures a smooth, lump-free filling.
- Don’t Skip the Chill: Chilling the bars is non-negotiable for that perfect cheesecake texture. I know it’s hard to wait, but trust me, it’s worth it.
- Customize the Crust: If graham crackers aren’t your thing, try swapping them for gingersnap crumbs or even crushed Biscoff cookies for an extra fall vibe.
- Make Ahead: These bars are a dream for entertaining ?”, because they can be made up to 3 days in advance and stored in the fridge. Perfect for Thanksgiving prep!
- Freezer-Friendly: Wrap individual bars tightly in plastic wrap and freeze for up to 3 months. Thaw in the fridge overnight before serving.
Why These Bars Are Perfect for Family Gatherings
There’s something so heartwarming about sharing a tray of these Pumpkin Cheesecake Bars with the people you love. Last fall, I brought a batch to a family potluck, and I swear, it was like I’d won the lottery. My cousin, who’s notoriously picky about desserts, went back for thirds, and my mom asked me to email her the recipe before I even left the house. These bars have a way of bringing everyone together, whether it’s over a shared love of pumpkin spice or just the joy of a really good dessert.
They’re also super versatile. Serve them at a fancy dinner party with a dollop of whipped cream and a dusting of cinnamon, or pack them up for a cozy picnic in the crisp fall air. They’re just as delicious with a cup of coffee on a quiet morning as they are at a bustling holiday gathering.
Variations to Make It Your Own
One of the best things about this recipe is how easy it is to tweak to your taste. Here are a few ideas to inspire you:
- Chocolate Drizzle: Melt some dark or white chocolate and drizzle it over the top for a decadent twist.
- Pecan Praline Topping: Sprinkle chopped, toasted pecans mixed with a little caramel sauce over the whipped cream for extra crunch.
- Gluten-Free Option: Use gluten-free graham crackers or almond flour for the crust to make these bars gluten-free.
- Mini Bars: Use a mini muffin tin to make bite-sized pumpkin cheesecake bites—perfect for parties!
A Little Fall Nostalgia
Every time I make these bars, I’m reminded of my childhood in New England, where fall was practically a religion. My siblings and I would spend hours raking leaves into giant piles, only to jump in and destroy them. Afterward, we’d come inside to warm up with my mom’s pumpkin bread or hot cider. These Pumpkin Cheesecake Bars capture that same cozy, nostalgic feeling for me. They’re like a taste of those crisp autumn days, and I hope they bring a little of that magic to your table, too.
Final Thoughts
These Pumpkin Cheesecake Bars are more than just a dessert—they’re a celebration of fall, family, and the simple joy of sharing good food. Whether you’re a seasoned baker or just dipping your toes into the world of homemade desserts, this recipe is approachable, delicious, and sure to impress. So grab your mixing bowls, crank up that cozy fall playlist, and let’s make some memories in the kitchen.
I’d love to hear how these bars turn out for you! Drop a comment below or tag Familyhouse on social media with your creations. And if you’re looking for more fall-inspired recipes, check out our other posts on pumpkin spice muffins and apple cider donuts. Happy baking.