
There’s something undeniably magical about the smell of apples and cinnamon wafting through the house on a crisp fall afternoon. It’s the kind of scent that wraps you in warmth, conjures up memories of cozy family gatherings, and makes you want to curl up with a hot cup of cider. For me, that magic is perfectly captured in a homemade apple crisp—a dessert that’s simple yet soul-satisfying, rustic yet refined. Here at Familyhouse, we’re all about creating moments that bring loved ones together, and this apple crisp recipe is the perfect way to do just that. Whether you’re hosting a big family dinner or just craving a sweet treat to share with your kids, this recipe will become a staple in your home. Let’s dive into everything you need to know to make the ultimate apple crisp, from picking the perfect apples to serving it with a scoop of vanilla ice cream.
Why Apple Crisp is a Fall Favorite
Apple crisp is the ultimate comfort food. It’s warm, buttery, and just sweet enough to feel indulgent without being over-the-top. Unlike its fancier cousin, apple pie, apple crisp is delightfully low-maintenance. There’s no crust to roll out, no lattice to perfect—just a pile of tender, spiced apples topped with a crunchy, golden oat topping. It’s the kind of dessert that feels like a hug, and it’s versatile enough to serve at a casual weeknight dinner or a festive holiday gathering.
What makes apple crisp so special is its ability to highlight the natural sweetness and tartness of apples. When baked, the apples soften into a jammy, flavorful base, while the topping adds a satisfying contrast of textures. Plus, it’s a recipe that’s forgiving and customizable, so you can tweak it to suit your family’s tastes. Love a bit of extra spice? Add more cinnamon or a pinch of nutmeg. Prefer a nutty crunch? Toss in some chopped pecans. The possibilities are endless, and I’m excited to share my go-to recipe with you, along with tips to make it your own.
Choosing the Right Apples for Your Crisp
The key to a stellar apple crisp lies in the apples you choose. Not all apples are created equal when it comes to baking. You want a variety that holds its shape during cooking but also offers a balance of sweet and tart flavors. Here are my top picks for the best apples for apple crisp:
- Granny Smith: These tart, firm apples are a classic choice for baking. They hold up well under heat and provide a nice contrast to the sweet topping.
- Honeycrisp: If you prefer a sweeter apple, Honeycrisp is a fantastic option. They’re juicy, crisp, and add a delightful sweetness to the dish.
- Braeburn: These apples offer a perfect balance of sweet and tart, with a firm texture that doesn’t turn mushy when baked.
- Jonagold: A cross between Jonathan and Golden Delicious, Jonagold apples bring a sweet-tart flavor and great texture.
For the best results, I recommend mixing two varieties—like Granny Smith for tartness and Honeycrisp for sweetness. This combo creates a more complex flavor profile that elevates your crisp to the next level. Aim for about 6-8 medium-sized apples, which will yield enough filling for a standard 9×13-inch baking dish.
Ingredients for the Perfect Apple Crisp
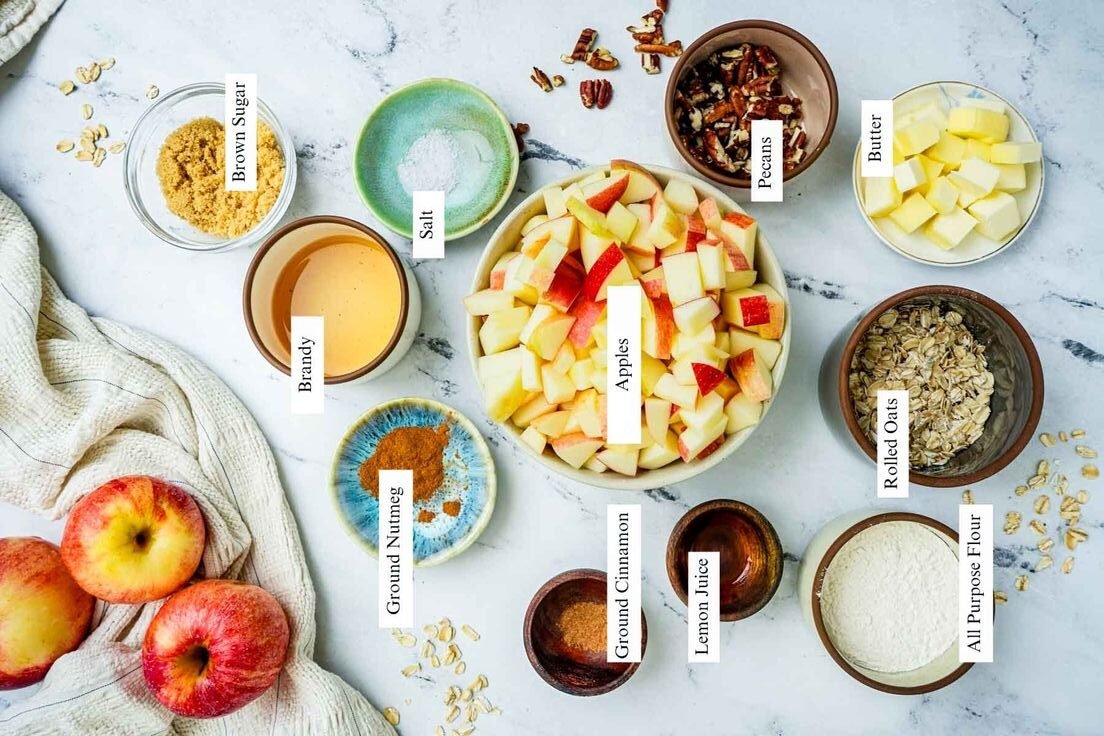
This recipe serves 8-10 people, making it ideal for family gatherings or leftovers (trust me, you’ll want leftovers!). Here’s what you’ll need:
For the Apple Filling:
- 6-8 medium apples (about 6 cups sliced), peeled and sliced thinly
- 1/4 cup granulated sugar
- 1/4 cup brown sugar, packed
- 1 tablespoon all-purpose flour
- 1 teaspoon ground cinnamon
- 1/4 teaspoon ground nutmeg
- 1 tablespoon lemon juice
- 1 teaspoon vanilla extract
For the Crumble Topping:
- 1 cup all-purpose flour
- 1 cup old-fashioned rolled oats
- 3/4 cup brown sugar, packed
- 1/2 teaspoon ground cinnamon
- 1/4 teaspoon salt
- 1/2 cup unsalted butter, melted
- Optional: 1/2 cup chopped pecans or walnuts for extra crunch
Optional for Serving:
- Vanilla ice cream
- Whipped cream
- Caramel sauce
Step-by-Step Instructions for Making Apple Crisp
Now, let’s get to the fun part—making the apple crisp! This recipe is straightforward, but I’ve included some tips to ensure your crisp turns out perfectly every time.
Step 1: Preheat and Prep
Preheat your oven to 350°F (175°C). Grease a 9×13-inch baking dish with butter or non-stick spray. If you prefer a thicker crisp, you can use a 9×9-inch dish, but note that the baking time may need a slight adjustment.
Step 2: Prepare the Apple Filling
Peel, core, and slice your apples into thin, even slices (about 1/4-inch thick). This ensures they cook evenly and create that luscious, jammy texture. In a large mixing bowl, toss the apple slices with granulated sugar, brown sugar, flour, cinnamon, nutmeg, lemon juice, and vanilla extract. The lemon juice adds a bright note and helps prevent the apples from browning, while the vanilla brings a subtle warmth. Stir until the apples are evenly coated, then spread them evenly in the prepared baking dish.
Pro Tip: If you’re short on time, you can skip peeling the apples. The skins will soften during baking, and they add a bit of extra texture and nutrition. Just make sure to wash the apples thoroughly.
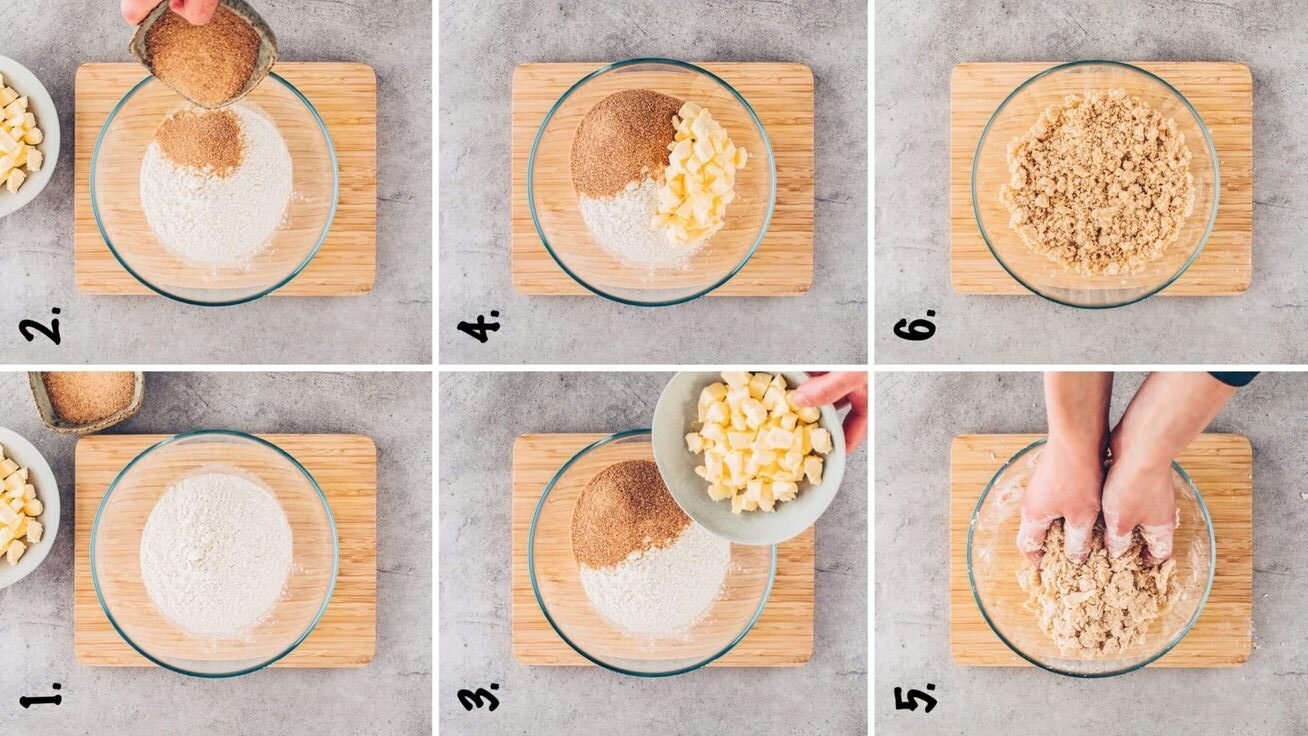
Step 3: Make the Crumble Topping
In another bowl, combine the flour, rolled oats, brown sugar, cinnamon, and salt. Stir to mix, then pour in the melted butter. Use a fork or your hands to mix until the mixture forms coarse crumbs. If you’re adding nuts, stir them in now. The topping should look like wet sand with some larger clumps—this is what gives your crisp that irresistible crunchy texture.
Pro Tip: Don’t overmix the topping. Those clumps are what make the crisp so delightful, so leave some texture in there!
Step 4: Assemble and Bake
Sprinkle the crumble topping evenly over the apples, covering them completely. If you like an extra-thick topping, feel free to make a bit more, but don’t go overboard—you want a good balance of apples and crumble. Bake in the preheated oven for 40-50 minutes, or until the topping is golden brown and the apple filling is bubbling around the edges. If the topping browns too quickly, cover the dish loosely with foil for the last 10 minutes of baking.
Step 5: Serve and Enjoy
Let the apple crisp cool for about 10 minutes before serving. This allows the filling to set slightly, making it easier to scoop. Serve warm with a generous scoop of vanilla ice cream, a dollop of whipped cream, or a drizzle of caramel sauce for an extra decadent touch. The contrast of the warm, spiced apples and the cold, creamy ice cream is pure heaven.
Tips for Making the Best Apple Crisp
Over the years, I’ve made countless apple crisps, and I’ve learned a few tricks to take this dessert from good to unforgettable:
- Don’t skimp on the spices: Cinnamon and nutmeg are the stars here, but you can also experiment with a pinch of allspice, cloves, or even cardamom for a unique twist.
- Adjust the sweetness: If your apples are particularly tart, you might want to add an extra tablespoon or two of sugar to the filling. Taste a slice of raw apple to gauge the sweetness before mixing.
- Make it ahead: Apple crisp is a great make-ahead dessert. You can assemble the filling and topping separately, store them in the fridge, and bake just before serving. Alternatively, bake the crisp a day ahead and reheat it in a 325°F oven for 15-20 minutes.
- Gluten-free option: Swap the all-purpose flour for a 1:1 gluten-free flour blend, and ensure your oats are certified gluten-free.
- Add-ins: For extra flavor, try mixing in 1/2 cup of dried cranberries or raisins with the apples, or sprinkle in some chopped candied ginger for a zesty kick.
Why This Recipe Works for Families
One of the reasons I love this apple crisp recipe is that it’s a crowd-pleaser for all ages. Kids love the sweet, crunchy topping, while adults appreciate the warm, spiced apples. It’s also a fantastic recipe to make with your family. My kids love helping me peel and slice the apples (with supervision, of course!), and they get a kick out of mixing the crumble topping with their hands. It’s a great way to create memories in the kitchen while teaching little ones about cooking.
Plus, this recipe is forgiving enough for beginner bakers. Even if your apples are sliced a bit unevenly or your topping isn’t perfectly distributed, it’ll still taste amazing. The simplicity of the recipe means you can focus on enjoying the process rather than stressing about perfection.
Storing and Reheating Your Apple Crisp
If you’re lucky enough to have leftovers, apple crisp stores beautifully. Cover the baking dish tightly with plastic wrap or transfer the crisp to an airtight container and refrigerate for up to 4 days. To reheat, pop individual portions in the microwave for 20-30 seconds, or warm the entire dish in a 325°F oven for 15-20 minutes.
You can also freeze apple crisp for up to 3 months. To do so, bake it as directed, let it cool completely, then wrap the dish tightly in plastic wrap and foil. When you’re ready to enjoy it, thaw in the fridge overnight and reheat in the oven.
A Personal Note
This apple crisp recipe holds a special place in my heart. Growing up, my grandmother would make a version of this dessert every fall, using apples from her backyard tree. The smell of her kitchen, filled with the aroma of baking apples and buttery oats, is one of my fondest memories. Now, I make this recipe for my own family, and it’s become a tradition we all look forward to. There’s something so comforting about gathering around the table, scooping warm apple crisp into bowls, and watching everyone’s faces light up with that first bite.
I hope this recipe brings the same joy to your home. Whether you’re making it for a special occasion or just because, it’s a dessert that’s sure to create lasting memories. If you try it, I’d love to hear how it turned out! Share your thoughts in the comments below, or tag us on social media with your apple crisp creations.
Conclusion
This apple crisp recipe is more than just a dessert—it’s a way to bring your family together, celebrate the flavors of fall, and create moments that linger long after the last bite. With its tender, spiced apples and buttery, crunchy topping, it’s a dish that’s as easy to make as it is to love. So grab some apples, preheat your oven, and let’s make some fall magic happen in your kitchen. Happy baking!